Back to Contents
Back to Railways Page
Link to Sitemap
Back to the last assembly page.
I bet you thought this page was going to be all about painting and
finishing, didn't you? And lots of pictures too? Hmm, well as I needed to keep the model dust-free while painting, the pictures don't re-appear until the loco is fully decorated at the bottom of the page...
Well actually it is. After finishing the construction of the model I
looked back through the notes I had made as I went through the build and
did a final check of the model against the drawings. I realised there
were a couple of the finer details missing; the toggle catches on the
front bonnet side doors and the conduit and switchbox for the front
headlamps.
The toggle catches were soldered up from 5 amp fusewire. A length of
wire was pulled out from the roll (to straighten it), tinned with normal
tin/lead cored solder and then cut into two pieces using a sharp,
curved, scalpel on a firm cutting surface (scrap plasticard). The sections
were then joined in 'T' shapes (plenty of liquid flux and a fairly dry
iron) before being trimmed to final size. I left the tails long (about
10 - 15 mm) so that there was something to hold on to! I needed 12 so made 15,
broke one when rinsing the flux from them after making; fired one into a
low Earth orbit using a pair of tweezers and have one left as a spare.
I drilled 0.35mm holes in the top and bottom runner of each of the
front three door panels on each side; six holes per side. The toggles were
then threaded through, a little thick superglue applied on the reverse
and then they're 'twizzled' to pull the glue into the hole, before
turning them to the correct orientation. Once the glue had set (about an hour to be sure) the tails were trimmed off inside the body again using a sharp curved scalpel. Job done - but I'll have to
remember to be careful not to catch them when I'm doing the weathering.
The lighting conduit and switchbox uses Weinert 8274. There's only one
of the correct style of switchboxes supplied on the sprue so be
carefull. The rest of the parts are used to do the service light conduits
under the running plates on steam locos. I cleaned out the hole cast in
to the part with a 0.4mm drill and soldered in a length of the handrail
wire supplied in the kit. Two holes were drilled in the bufferbeam;
one 0.75mm for the switchbox and one 0.4mm under the left hand headlamp
to retain the end of the wire. The photos will give you an idea of what
I mean. I hope.
It was during this last stage of detailing that I broke one of the cab
steps off for the second time. I can take a hint so I decided to
reinforce the steps. The step that broke off was refitted to start with. I
drilled two 0.5mm holes just behind the back of the buffers in their
compressed position. A length of 0.45mm brass wire was soldered in to
this hole and then bent over to touch the back of the step. This joint
was quickly soldered and then the whole lot carefully trimmed up. I
recommend supporting the steps whatever you choose to use to assemble your
model. Even though it appears to be a little less prototypical it is
well worth doing; the annoyance factor of having to re-stick the steps
periodically would be considerable.
So now to the painting. First stop - preparing the model. There are
two requirements for good paint adhesion; a keyed (microscopically
roughened) surface and cleanliness. The first has been largely ensured by
the wire-brushing used to clean the castings for gluing/soldering.
After finishing the model it's worth using a good quality cream cleaner; I
use one of the 'with bleach' varieties. A toothbrush and warm water is
the required method for application and the run off from the model will
probably go horribly black. A quick rinse and then leaving the model
to dry in a dust-free environment finishes this stage.
Many of the cleaning substances contain surfectants or glossing agents;
they put a layer of shiny stuff on the surface to make things look nice
and clean and ,er, shiny. Great for your sink - but not so good for a
model when you want to paint over them as they act as a barrier layer. There are two
courses to go from here. I'll start with a plastic model. In this
case I use car screenwash diluted with warm water; again a toothbrush
works really well to get into all the nooks and crannies and then rinse and
dry as before. For metal models we can be a bit more aggressive. I
like to use etching primer; so the model needs thorough de-greasing with
cellulose thinners. A hogs-hair brush (cheap ones from your local
hardware superstore) is used to work in and wash down the model with the
cellulose thinners. The model can then be left to dry.
I've heard of people using all sorts of stuff at this stage of
cleaning. Acetone for example seems to be widely used; but it'll dissolve
superglue. Clear vinegar also works well, but if left for too long it will
eat the solder itself. My Dad uses a bath of washing soda and warm
water, with the model sitting on a bed of aluminium foil. Such alchemy
only really works well on brass; but will mean that the first stage
(cream cleaner) can be cut out and being a fairly strong alkali it
neutralises the acid flux really well.
Your model should now be warm and dry. Aah; bless! So time to paint.
I prefer to use an airbrush where possible, but I guess a few pointers on brush painting might help? A
good finish is possible when brush painting, paint formulation seems to
have really come on well in the last few years. I use good quality brushes and tend
to buy them from art suppliers rather than model shops; you'll get a
better range and a greater chance of someone knowing what they're talking
about. Don't skimp; buy a range of sizes (and lengths) and good quality
sable or squirrel. Some artificial sable brushes are okay too; but
they won't save you much money. And also make sure you throw them away
(or at least don't use them for fine model painting) when they start
getting scruffy.
I use Phoenix Precision etching primer; you'll need the special
thinners to go with it even if only for cleaning your brushes/airbrush. Mix
well, thinning it can be useful trick even if you're brush painting (I do - use an old saucer or
something else non-metallic and solvent resistant). I use the paint
off the stirrer and aim to apply a thin, even coat in one go. This is easier to get a smoother coat with an airbrush, in my case the Badger 'Anthem' - but it's very important to clean it quickly and well after using etching primer - cellulose thinners is a good idea. The model can then be
left in the warm dust-free environment once more until it reaches the
stage that you can open said container and not get a whiff of solvent.
This can take a little while; two or three days is not unusual.
By this stage I'm casting around for the next job to do. From here on
the painting and finishing will come down to a work pattern that's
something like half an hour of work every day until it's finished; so
something else can be progressed through the 'I wonder..?' stage at the same
time.
That's it for the primer and I know it can look a bit patchy. To be
honest it doesn't really matter as long as the finish doesn't show any brush
marks, sags or runs. At this point you're ready for the next coat. I change over to
enamel paints from here on in. Favourite brands are Humbrol, Revell and
MoLak; but I use what's applicable and often mix brands on one model;
this loco is a case in point. I always use Humbrol thinners for
cleaning brushes, no matter what the paint in use. The paint may need
thinning to make it flow more easily and in these cases I sometimes use Swan
or Ronson lighter fluid in preference to enamel thinners. Lighter fluid
often causes the paint to flow better, but it sets faster and may not
dry properly - a trial is usually needed to establish which works
better.
The paint colours are referred to in the text of the instructions. The
green is subject to some conjecture as Weinert comment that the paint
was often brightened with yellow. So is that fading or mixing? It
doesn't matter, I decided that RAL6020 was too dark and settled on a
slightly more olive green colour; RAL 6003.
- Body, quoted: Chromoxidgrün RAL6020, Used instead: RAL6003, Revell 361.
- Chassis, Karminrot RAL3002, Molak (Weinert 2611). Revell 36 is also good.
- Cab interior, quoted: Hellgrau RAL7005. Used instead: RAL7001, Revell 374
- Cab roof, quoted: Gunmetal RAL9006. Used instead: Humbrol 106 (also used for silencer)
- Running plates and small fittings, Schwarz RAL9005. Humbrol 85.
- I also used Silver, Humbrol 11 for inside the lamps...
All good fun. During this stage I'm not going to show the paint going
on colour by colour. (Boring!). But suffice to say the chassis was
painted red (don't forget the extra brake blocks and the keeper plate) and
then the tops of the running plates and the cab floor were painted
black. The front lamps were painted green, with black lamp bodies and
silver reflectors.
The roof was painted grey outside - I didn't bother with painting the inside. The loco body was airbrushed green, followed by black for the
lower bonnet sides - on my loco the black doesn't extend across
underneath the radiator. Then the cab interior was painted, including the control console and seat (Weinert 8196). The controls on the console (and the hand wheel on
the inside of the cab) were painted red, the instrument panel was black
(to show up the decal of the dial faces), as were all the handles (to
portray the rubber grips). The rear lamps were painted black and
silvered.
There's a few odd details need painting now - the horn is light grey, the
silencer is roof grey. The etched plates (if you're going to use them)
can be cleaned and given a coat of black paint; the numbers will be
polished bright with wet and dry paper once the paint has completely
hardened for a few days. I also needed to paint the ends of the driving wheel
axles red for my loco.
Decaling is the next job. The Weinert decals for '022 were trimmed out of the sheet supplied. Note that the cabside number and data panel is 'handed' one way - suitable for the non-driving side of the cab only; the allocation and weight panels need swapping round on the driver's side. I used Microscale MicroSol and MicroSet to get the lettering down neatly. It works too; no visible decal film. The overhead electrical warning symbols on my sheet were a touch out of register so I used 5 spare ones from a Gaßner sheet. Incidentally Gaßner also do decals for a V36 in their set V351 for DR shunting diesels. The final touches are the two 'Deutsche Reichsbahn' plates from the supplied fret, cut out using a curved scalpel blade on a firm surface (old CD box) and stuck down with a smear of varnish.


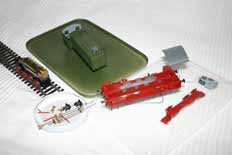
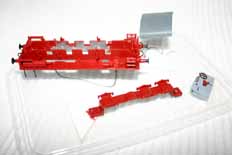
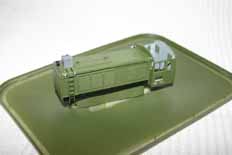
With the decals on they'll need a few days to dry out completely before varnishing to seal them in. These three pictures show the parts after the varnish has had a couple of days to harden off; you'll note the various bits of wire, bog-roll, etc. used as painting handles. In some cases (such as the cab roof) they've actually been stuck on to the model part; they'll be snapped or cut off before assembly. The model parts are all on food carton lids - the 'bottoms' have lots of small holes punched in their bases and are used to cover the parts, allowing solvent to evaporate; and stopping dust getting in. I use Ronseal Satin (I kid you not - it does do exactly what it says on the tin) through the airbrush. Don't be tempted to brush this on a fine model - it'll look horrible. Humbrol Satin Coat might be worth a punt if you're brushing; though most modellers I know always spray varnishes.
We're now very close to final assembly. So do you want to weather or
not? I do; but it would take me as long again to describe my weathering
techniques. I use enamels, Dave uses artists acrylics; the results are
very similar. The reason I ask now is that it may be easier to weather
the chassis before the wheels are installed.
The next page covers the final assembly of the model...


