Back to Contents
Back to Railways Page
Link to Sitemap
CNR SW1200
Class GS-12e, #7727
This is the second locomotive for my Canadian HO layout which I mistakenly thought was going to be an easy conversion from the Proto 2000 SW1200 model. The fact that it is a Canadian National prototype soon put paid to that.
My intention was to use the original motor and chassis but as I want to install a sound decoder and speakers it meant that I had to rethink my ideas due to the lack of space. Following consideration of the options I felt the only way I could gain the space for the decoder was to replace the existing motor with a Mashima 1630 motor. I shall describe this process later and begin with the body.
The bodywork
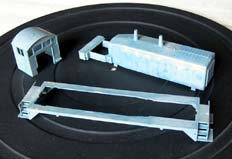
As usual I started by stripping the detail parts from the body and separated this into its three components; the hood, cab and walkway. These were then immersed in Superstrip paint stripper to remove as much of the factory applied paint as possible. The model was originally a Norfolk and Western version and being blue some traces of the paint is still visible. For some unknown reason it reminds me of the woad dye used by the Ancient Britons.
Anyway, to continue, I began with the walkway by marking out the position of the handrail stanchions along the length of the frame and then drilled 0.5mm holes to accept the Smokey Valley stanchions I had left over from projects many years ago. In fact, I had 13 and fortunately only needed 12. 0.45 mm brass wire was used for the handrails and soldered to the fitted stanchions. Care is needed here not to linger with the hot iron on the stanchion otherwise the plastic will melt. In theory I should have used 0.33 mm brass wire however 0.45 mm wire is easier to solder where butt joints are required and will become apparent with the end handrails.
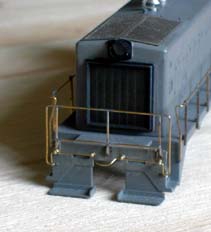
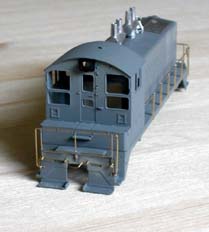
The end stanchions and handrails posed a bit of a problem as there were no suitable ones available for an EMD phase 1 NW/SW switcher. Small end plates were made from a fine mesh, again left over from earlier projects, and 0.45 mm brass wire. The wire was bent into an 'L' shape, cut to length, soldered to the end plates and the solder running into the mesh to form a solid plate and the short leg of the 'L' forming a locating pin. Six were made in total and then three glued onto the each end of the walkway. Now comes the tricky bit.
Having formed the end handrails from 0.45 mm brass wire I began soldering these to the tops of stanchions, again being quick as not to melt the plastic ends. One end went perfectly but the other was a bit of a trial as one corner of the end started to melt as a result of lingering with the soldering iron. At this point I stopped and had a cup of tea. I rebuilt the end from plasticard and plastic filler. Once hardened, I re-profiled the end then refitted the stanchion. This time I was quicker with the soldering iron when installing the end handrail. The photographs above show the front and rear handrails.
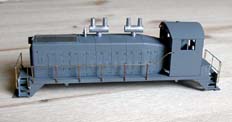
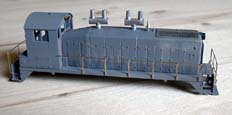
Having breathed a sigh of relief that the end handrails were finished I began the preparation of the body to accept the detailing parts. My first task was to drill holes to take the Detail Associates nut, bolt and washer fixings for the hand grabs and handrail ends. Next, the moulded fan grille was filed off the front ready to accept the Details Associates SW1200 radiator flange and grille. Holes were drilled in the body behind the radiator area into which I applied the glue from the rear whilst holding the radiator on the front. The grilles from the hood roof were removed by daisy chain drilling around the inside edge of the grille and punching it out. The resulting hole was tidied up with files ready to accept the etched Details Associates version. Yet more holes were drilled in the hood roof for the two exhausts stacks and bell. A small brass plate was formed into a mounting bracket for the Details Associates air horn. Uncoupler lift bars were formed from 0.45 mm brass wire and mounted to the ends with Weinert short handrail knobs this time left over from European detailing projects. The photographs above show the walkway with the Smokey Valley stanchions and the body with some of its fittings. The latter not being glued at this stage apart from the Detail Associates early NW/SW headlights on the hood and cab. At the time of writing it became apparent to me that the Keystone Locomotive Works exhaust stacks look too short and these will be substituted with the Miniatures by Eric castings.
Chassis work
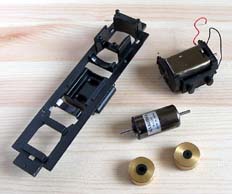
Having bitten the bullet I turned my attention to the chassis. As alluded to earlier I decided to re-motor the model with a Mashima 1630 motor and to do this it meant making a new motor mount. The photograph shows the chassis devoid of the bogies and the new motor and the original flywheels. The original motor is shown for comparison.
The space left following removal of the original motor was filled with liquid lead (small lead pellets) and a new motor cradle was fashioned from sheet lead. This is all held in place with CA glue and having handled lead I scrubbed my hands. I make no apology for repeating that lead is toxic and it is imperative that you scrub your hands after handling it.
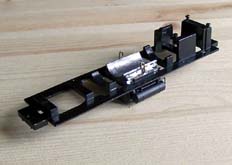
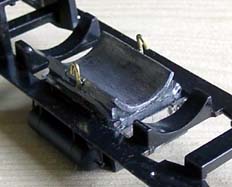
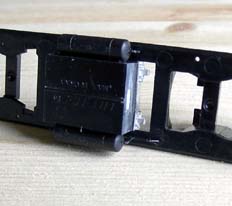
Once the glue had set I made two hooks from 0.9mm brass wire to form part of the motor fixing. The motor will be seated in the cradle with silicon sealant and a traction tyre will stretched over the motor and looped over the hooks. At this stage I fitted a Details West EMD fuel tank bracket which was shortened from 24mm to 21.5mm. These photographs show the motor cradle and the fuel tank brackets.
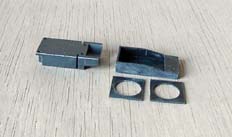
As mentioned at the outset the SW1200 was to include sound and the installation of this proved to be one of those things I enjoy Ė a challenge. And my, did this turn out to be a challenge and a half. My original intention was to retain both flywheels intact and fit the speaker chamber in place of the removable weight above the leading truck. So I merrily made a sound chamber from plastikard to the dimensions of the removable weight and then tried to fit two ESU Loksound 16mm diameter speakers. The photograph above shows the first sound chamber under construction to the same dimensions as the removable weight.
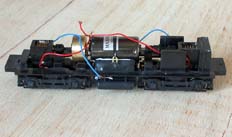
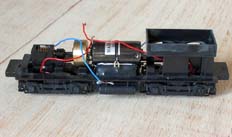
However much I struggled I just could not make the 16mm speakers fit into the available space unless I was able to hop into different universe. The 23mm diameter speaker was out of the equation since the internal width of the hood was 22mm. So what to do next? In the end I decided to remove the leading flywheel and make a new sound chamber and hey presto, a workable solution. The initial stages of the new sound chamber can be seen above together with the modified chassis and new motor.
This is as far as I went with the chassis for the moment. After a discussion with Steph earlier this year I purchased a Badger Anthem dual action airbrush in order to try my hand at airbrushing. Prior to this I was brush painting my models. Having previously never used an airbrush in earnest and before diving in at the deep end, I practised the airbrushing technique on some old models. Following this I turned my hand to the SW1200 with a bit of trepidation. After which I neednít have worried as the results speak for themselves. The black is one part Polly Scale grimy black and three parts Polly Scale engine black and the red is Polly Scale GTW montmorency orange. Once dry the model was then airbrushed with Vallejo satin varnish. Vallejo are a Spanish acrylic paint manufacturer who have a large range of military colours. The photographs also show the Miniatures by Eric exhaust stacks replacing those by Keystone which will, in turn, be used on a future model.
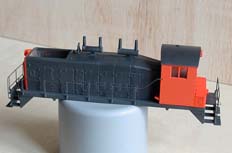
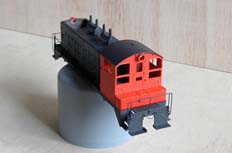
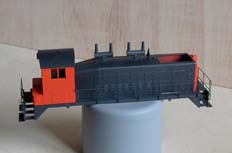
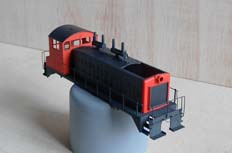
Following this I proceeded to attach the various fittings namely the front radiator grille, air horn, all weather cab window on the drivers (engineers) side; and sunshade, deflectors, re-rail frog and arm rest on the firemanís side. I reused the original glazing and cut each pane from the fret and cleaned up. The moulded windscreen wipers were removed from the panes with a sharp scalpel and then sanded and polished using a manicurists 3 part buffing file. The glazing was then inserted into the window openings which is a vast improvement over the original flush glazing. Prior to this I painted the inside of the window frames black and ran a fine permanent black marker pen on the exterior window moulding to simulate the rubber seals. Once the glazing was in place Weinert windscreen wipers were fitted and a firecracker aerial placed on the cab roof. Microscale decals were applied and when dry, sealed with a further coat of Vallejo satin varnish.
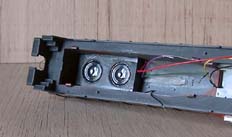
After painting and decaling I installed the rear lighting using Minaitronics 3.0mm dayglo LEDs and inserted a 1K resistor into the circuit from the decoder blue wire and the LED anode with the LED cathode connected to the yellow wire. On this type of LED the anode is identified by being the longer lead. This was repeated for the headlight except the white wire was connected to the cathode. Both LEDs are held in with epoxy resin glue. The original cab interior was then inserted into the cab and after this I installed the finished sound chamber into the nose of the hood which can be seen above. The speakers in the sound chamber are held in with silicone bathroom sealant.
Once the sound chamber had set I fitted the ESU Loksound 3.5 decoder and tested the loco. After testing I fitted the body to the chassis and the remaining cab handrails, couplers and air hoses were added. The decoder was then reprogrammed with the correct EMD 567 engine and 3 chime Nathan horn using the ESU Lokprogrammer. This is a very handy and easy to use piece of kit allowing you to adjust the sounds to match a particular prototype. Fine tuning of the decoder was completed using the SPROG II DCC Decoder Programmer. Here are some photographs of the completed and weathered locomotive.
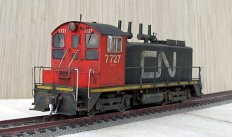
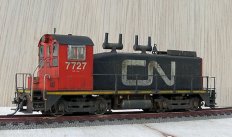
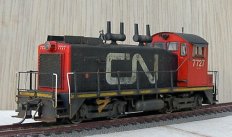
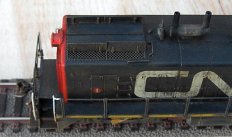
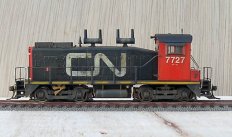
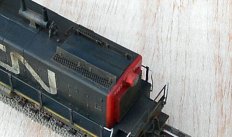
In conclusion this has been an interesting and satisfying conversion to achieve a Canadian National prototype not withstanding the challenges that were thrown up along the way namely the introduction of sound into the model and the use of LEDs to illuminate the headlights. These led me to adapt my normal approach to the building regime insofar that the work on the chassis and body is carried out concurrently as described in the preceding paragraphs rather than complete the body before the chassis or vice versa.


