Back to Contents
Back to Railways Page
Link to Sitemap
CNR GP9 Phase II
#4500
This is one of the locomotives that will grace my new, currently nameless and yet to be built, Canadian HO layout. This particular locomotive was chosen as I happened to chance upon a photograph of it on the excellent www.cnrphotos.com website (external link in new window) in original green livery operating in the 1970s and 80s. As usual I did not choose the easiest one to model but least it is easier than Steph’s lightweight GP9 Phase III.
I have no idea why I chose to model Canadian National (CN). Maybe it is because I enjoy the challenge? of the non-standard prototypes akin to my St Louis Southwestern locomotives.
The main differences that characterised the majority of the CN GP9s are the louvre positions to accommodate CANADIAN NATIONAL on the long hood, the lightweight truck variant for branch line duties and the removal of the dynamic brake although the dynamic brake hood remains. This is the story so far pending delivery of additional detail parts and Steph’s evaluation of the speaker positioning within the GP9 body. As you may have gathered our Canadian locomotives will incorporate DCC sound decoders.
My conversion is based on a Proto 2000 phase II model and my first job was to disassemble it into its components. Although my approach to modelling is to do bits all over the place i.e. a bit work on the body then a bit on the chassis, body, chassis and so on. You get the picture. However for this I will deal with the body and chassis separately.

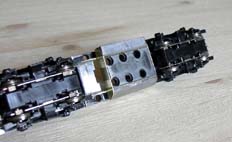
To begin with the chassis. Having studied the prototype photographs the two noticeable differences are that there are no air tanks and the fuel tank is of a smaller capacity. Taking the chassis, a large hacksaw and now knowing how a diamond cutter feels when he is about to make the first cut I set about brutally removing the air tanks and slimmed the fuel tank block on either side to the width of the frames. Once I removed these the resulting chassis was cleaned. I then made up a pair of dummy frames from 0.3mm brass to which I soldered 0.45mm brass wire to represent the ‘I’ beam. The completed side frames were then glued to the chassis with two part epoxy resin (this is used throughout the chassis conversion) and left a couple of days to set. The photograph above shows this stage.
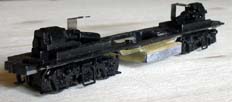
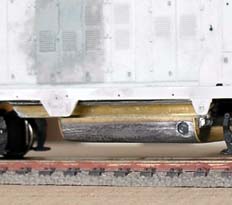
My attention now turned to the fuel tanks. The CN version is 1000 imperial gallons and is the same length as the Proto 2000 but not as deep. To assist I made two tank ends from 0.3mm brass using the Proto 2000 tank as a template which were glued to the chassis. The fuel tanks are made from 4 layers of lead sheet and one of copperclad sleeper held together with two-part epoxy resin glue. The resulting tanks were trimmed to length and glued to the chassis between the tank ends and left to set. After several days I then filed the tanks to match the brass templates fitted to the chassis earlier. The tanks were finished with fine grade wet and dry emery paper. The photograph above shows the brass templates and the fuel tanks before and after filing.
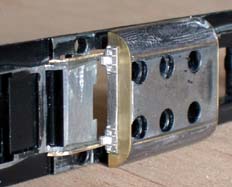
To complete the fuel tanks Details West EMD tank brackets were attached with superglue and a hole drilled in the fireman’s side of the fuel tank to accommodate a Detail Associates round fuel gauge. These can be seen above.
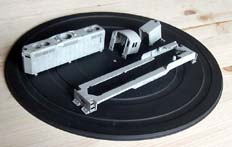
Following the separation of the body from the chassis the handrails were removed from the body, which in turn was broken down into its components namely the long hood, short hood, walkway and cab. These were put into a tub of Superstrip (a plastic compatible paint stripper) and left for 20 minutes to soften the paint. After 20 minutes the parts were scrubbed with an old toothbrush and cleaned in water. Be careful here as in my case the Superstrip softened the glue that held in the glazing which was fortunately spotted and removed before any of these were washed away for ever. The cleaned parts can be seen above.
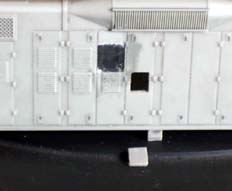
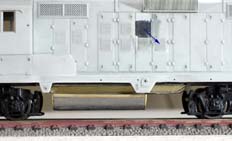
As alluded to earlier, a large majority of the CN GP9s had slightly different louvre positions on the long hood to accommodate the CANADIAN NATIONAL lettering. This means moving one of the louvres on each side of the long hood to replicate this on the model. I took care over this procedure as I only had one chance without a spare body to raid for louvres. I began by drilling a lot of 0.5mm holes around the louvre in question on either side of the long hood and removing these. The resulting hole was filed out to the width of the door panel, filled with a piece of plasticard and blended in to the door. The two louvres removed from the body were cleaned up and set aside. Again, on either side, two smaller holes were cut in the new position in the adjacent door panel and the louvres cemented in taking care to install the louvres the right way up. The photograph above shows repositioning of the louvres (with the blue arrow) and parts of the skirt removed from the walkway sill.
The final stage thus far was to drill holes above those left from the removal of the original plastic grab irons and fit Detail Associates plastic hex nut, bolt and washer mouldings. I also made up a winterization hatch from drawings of a SOO Line GP9 I removed from the February 1999 issue of Model Railroader magazine.
This page will, of course, be updated as the model progresses.
Both Steph and myself will be installing sound decoders in our Canadian locomotives, we have on several occasions discussed the order of conversion, reconstruction and completion of this and similar models. The final assembly has to be thought out in order to achieve the best sound and to date it is our intention to use the cab as part of the back sound chamber which means sealing it from the front sound. This naturally gives issues on how to put the model together and to date we have come to the conclusion that the model will have to be completed as a series of finished sub assemblies.


